How to Make a DIY Foam Ottoman
Ottomans are an excellent piece of furniture if you're short of storage at home. Available in a range of designs and materials, they're truly customisable, but it can be tricky to find the perfect option for a particular space – you might find the right shape and colour but not the right size.
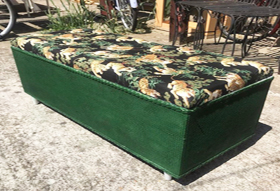
Building your own ottoman is a fun, achievable project, whether you're an avid DIY-er or a novice, and there's plenty of guidance for anyone making a custom design. With a little patience, we can all turn our hands to a DIY ottoman. Our customer Jason bought a piece of foam cut to size and upcycled an old 1950s ottoman that had sat untouched for years, kindly sending us a video and photographs of the result.
Five steps to make your own ottoman
- Decide on your shape and size – square, rectangular or circular. A square is most straightforward for beginners, and a typical ottoman measures about 1m by 1m, though this can vary.
- Cut four equal lengths from a plywood sheet, glue and clamp them into a box, then glue on a plywood base cut to your measurements. Reinforce the box with pine cleats glued around the base interior, and add pine blocks in each corner for support, clamping where possible.
- Wrap the base in your chosen material using one long length, finishing at a corner (easier to hide). Make sure it's wide enough, then use a staple gun to fold it over the top of the wood and underneath the base, securing with staples.
- Make the lid: cut a plywood shape the same size as the base. Order a 2-inch piece of firm, high-density polyurethane foam, using our cut to size calculator, adding two inches to the outer dimensions so the foam wraps under. Staple the foam under the lid, tucking the corners, then cover with your material and staple it in place.
- Join the upholstered top to the base with a continuous hinge and a toy-box lid support, and add four feet if you wish.
A firm, high-density foam top resists pressure if you also use the ottoman as a footrest or seat. If you're upcycling existing foam for the project, our guide to reusing old foam may help, and for more storage ideas, see foam for home storage.
For further guidance on building your own ottoman, please contact one of our friendly eFoam advisers.
Frequently asked questions
What foam is best for an ottoman?
A 2-inch piece of firm, high-density polyurethane foam works well, as it resists pressure if you also use the ottoman as a footrest or seat. When ordering, add two inches to the outer dimensions so the foam can wrap under and be stapled to the lid.
How do you make a DIY ottoman?
Build a plywood box and base, reinforce it with pine cleats and corner blocks, wrap the base in fabric, then make a foam-topped, upholstered plywood lid and attach it with a continuous hinge and lid support.
What size is a typical ottoman?
A typical ottoman measures around 1m by 1m, though this varies with your needs. A square shape is the most straightforward for beginners.