IKEA Hacks: Customise a Kura Bed and Build a Kallax Platform Bed
In the next instalment of our IKEA DIY hack series, here's a complete guide to customising the ever-popular IKEA Kura bed and building a custom platform bed from IKEA Kallax units with a made-to-order foam mattress. If you'd like another project afterwards, see our guide to turning two Poäng chairs into a sofa.
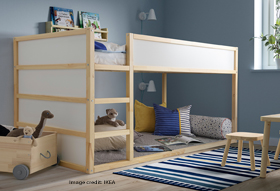
Customising your child's IKEA Kura bed can be fun and creative. With its adjustable design and large side panels, it's a blank canvas to personalise and make interactive. Below are three simple ways to turn the end panel into an engaging space for your child, with step-by-step instructions for each: individual foam shapes, a sticky puzzle, and a routine-style game.
1. Create an interactive panel with foam shapes
This method turns the end panel into a vibrant, changeable surface where your child can play with foam shapes.
Materials needed
- Foam sheets
- Velcro strips or dots
- Scissors or a craft knife
- Stencils for shapes (optional)
Step-by-step
- Measure the panel: measure the dimensions of the Kura bed's end panel so your foam sheet fits perfectly.
- Order your foam: using the foam cut-to-size tool, order a piece to cover the whole panel, choosing the thickness and density you prefer.
- Create foam shapes: order a second foam sheet, ideally in a lighter colour for contrast, and draw shapes on it with stencils or freehand – stars, animals, letters, whatever your child prefers.
- Cut out the shapes: carefully cut them out with scissors or a craft knife.
- Attach Velcro: apply Velcro strips or dots to the back of each shape, with corresponding pieces on the large foam panel.
- Design and play: your child can now rearrange the shapes on the panel as they like, fostering creativity and fun.
2. Build a sticky foam puzzle
Turn the panel into an interactive puzzle that can be taken apart and put back together.
Materials needed
- Two foam sheets
- Velcro strips or dots
- Paint, glitter, sequins (optional)
- Scissors or a craft knife
Step-by-step
- Measure and cut the foam: order two foam sheets – one as the base panel, one for the puzzle pieces.
- Stencil or draw a design: on the second sheet, draw a picture such as a house, tree or animal, using stencils or freehand.
- Decorate (optional): let your child decorate the sheet with paint, glitter or sequins before cutting it into pieces.
- Cut into puzzle pieces: carefully cut the sheet into several pieces; the more pieces, the more complex the puzzle.
- Add Velcro: attach Velcro strips or dots to the back of each piece.
- Fix Velcro on the panel: add corresponding pieces to the panel in the correct arrangement so the puzzle can be fixed in place.
- Enjoy: your child can now assemble and disassemble the puzzle whenever they want.
3. Make an interactive routine game
This turns the foam panel into an educational game – a "days of the week" or "morning routine" game to help your child learn sequencing and time management.
Materials needed
- Two foam sheets
- Velcro strips or dots
- Markers or paint
- Scissors or a craft knife
Step-by-step
- Measure the end panel: measure it and order two foam sheets, one for the base and one for the game pieces.
- Cut foam into pieces: cut the second sheet into several smaller pieces – for example seven for the days of the week.
- Label and decorate: use markers or paint to label each piece with the days, or steps of a morning routine such as "brush teeth", "get dressed", "eat breakfast".
- Add Velcro: attach Velcro to the back of each piece and corresponding dots to the panel.
- Arrange the game: your child can place the pieces in the correct order, learning sequencing in a fun, interactive way.
DIY IKEA Kallax platform bed hack
To take your IKEA bed-hacking further, you can build a custom platform bed from IKEA Kallax units, topped with a made-to-measure foam mattress.
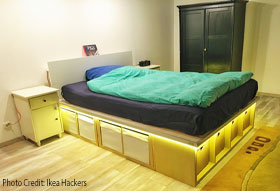
Materials needed
- 3 IKEA Kallax units (4-section)
- 2 large pieces of chipboard or slats
- 8 angle brackets
- 10 screws
- Optional: custom foam mattress
Step-by-step
- Assemble the Kallax units: lay two units parallel and place the third horizontally at the foot of the bed, forming a U-shape.
- Secure the units: use angle brackets to attach them to each other.
- Fix the headboard: attach a piece of wood to the wall at the head of the bed as a headboard, fixed securely with screws.
- Add the chipboard base: lay the two chipboard pieces on top of the Kallax frame to form the base, and secure with screws.
- Order your mattress: use the foam cut-to-size tool to order a custom mattress, choosing medium-high density polyurethane foam or memory foam for your desired comfort.
With these simple steps you'll have a fun, interactive Kura bed and a fully customised platform bed. For personal assistance, please contact one of our friendly, knowledgeable advisers.
Frequently asked questions
What foam mattress suits an IKEA Kallax platform bed?
Order a custom foam mattress cut to size, choosing medium-high density polyurethane foam or memory foam depending on your desired comfort level.
How do you build a Kallax platform bed?
Arrange three Kallax units in a U-shape and bracket them together, fix a wooden headboard to the wall, lay two chipboard pieces on top as the base, then add a foam cut-to-size mattress.
How can I customise an IKEA Kura bed?
Turn the end panel into an interactive surface using foam: attach foam shapes with Velcro, make a sticky foam puzzle, or create a routine-style game to help a child learn sequencing.