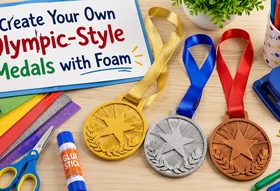
Create Your Own Olympic-Style Medals with Foam
Homemade Olympic-style foam medals are an easy craft for a school sports day, family games afternoon or celebration at home. They're light enough for children to wear, simple to personalise and can be made with basic craft materials.
This project works best with thin flexible craft foam or clean foam sheet offcuts. Adults should handle sharp cutting tools and supervise all work involving small parts.
What you will need
Gather thin foam sheets or offcuts, card for templates, ribbon, a pencil, ruler, child-safe scissors, a hole punch and suitable craft adhesive. Gold, silver and bronze-coloured paper, paint or foil can be added to create the traditional medal look.
For decoration, use felt-tip pens, foam letters, stickers or paper shapes. Avoid loose glitter with very young children and check that all materials are age appropriate.
Step 1: make a circular template
Draw around a cup or use a compass to create a circle on card. A diameter of roughly 70-90 mm is easy to decorate without becoming too heavy.
Cut out the card template and place it on the foam. Trace around it once for each medal.
Step 2: cut the foam medals
Use scissors for thin flexible foam. Thicker or denser material may need a sharp craft knife, which should be used only by an adult on a protected cutting surface.
Cut slowly so the edge remains smooth. Small imperfections can be disguised with a contrasting border or second foam layer.
Step 3: add colour
Use coloured foam from the start or cover the front with metallic paper. Apply adhesive sparingly and smooth from the centre towards the edge to prevent wrinkles.
Paint can also be used if it's suitable for the foam. Test an offcut first, because solvent-based paints and glues can damage some plastics.
Step 4: decorate the front
Add a large number for first, second or third place, or write the event name and participant's achievement. Stars, laurel leaves and simple sporting symbols work well.
For a school or club event, let each child create a personal design. Avoid copying protected event logos for commercial products without permission.
Step 5: make the ribbon hole
Use a single-hole punch where the foam is thin enough. For thicker material, an adult can make a small slot with a suitable punch or knife.
Keep the hole far enough from the edge that it won't tear. Reinforce the back with a small card or foam patch if needed.
Step 6: attach the ribbon
Cut a length that sits comfortably around the neck, then thread it through the hole and tie the ends securely. A breakaway connector is safer for organised children's activities because it releases if the ribbon becomes caught.
Alternatively, use a short ribbon loop and present the medal as a keepsake rather than something to wear.
Step 7: add a backing layer
For a firmer medal, bond a second foam circle or a piece of card to the back. Align the edges before the adhesive grips and place the medal beneath a light flat weight while it dries.
Don't use a heavy object that crushes soft foam or squeezes adhesive onto the visible face.
Ideas for different events
Create medals for running, obstacle courses, reading challenges, music, teamwork or kindness. Younger children may enjoy animal-shaped awards, while older pupils can design a full set for their class. A small rectangular label on the back can include the date and participant's name. For more, see our guides to foam for school projects and foam for party decorations.
Using foam offcuts
This project is a practical way to use clean leftover material from other craft or upholstery jobs. Different colours and thicknesses can be layered to create raised borders and symbols.
For larger craft projects, eFoam offers foam sheets and scrap foam offcuts. Choose a material that can be cut safely with the tools available.
Final safety check
Allow adhesive and paint to dry fully. Check that there are no sharp edges, loose decorations or ribbon knots that can open. Medals are decorative items and shouldn't be given to children who may chew the foam or small attached pieces.
With a simple template and a little decoration, every participant can leave with an award made especially for them.
Frequently asked questions
What foam is best for making craft medals?
Thin, flexible craft foam or clean foam sheet offcuts work best, as they are light enough for children to wear and easy to cut with child-safe scissors. Different colours and thicknesses can be layered to create raised borders and symbols.
Are foam medals safe for young children?
They are decorative items for supervised use. Adults should handle sharp cutting tools, a breakaway ribbon connector is safer for organised activities, and medals shouldn't be given to children who may chew the foam or small attached pieces. Always do a final check for sharp edges and loose decorations.
How big should a homemade medal be?
A diameter of roughly 70-90 mm is easy to decorate without becoming too heavy to wear comfortably.